Hey, good to see you here :-d …… In this article, we’re gonna discuss the Micropipettes & Guidelines Of Micropipetting….. If you have any queries, don’t forget to mention in comments….. Thanks
What are Micropipettes…
Micropipettes are the type of air displacement pipettes that are used to transfer the small quantities of solutions measured in microliters, 1000 µl (microliters) equals to 1 ml (milliliter) and is the maximum amount that is commonly dispensed with the micropipettes.
Micropipettes are of two types, the Fixed micropipettes, and the Variable Micropipettes. The Fixed micropipettes are designed to transfer the fixed amount of volume of the liquid. The fixed micropipettes cannot be adjusted to withdraw more or less of the volume.
On the other hand, the Variable pipettes come with a wide range of adjustments, can be adjusted to withdraw the desired volume within the range of micropipettes, say 10 µl – 100 µl micropipette which can be adjusted to any number in between 10 µl – 100 µl.
The variable pipettes are commonly used to draw the small amount of volume ranges 10 µl – 200 µl, most commonly to transfer the specimens, whereas the fixed pipettes are commonly used to transfer the large volume (1000 µl or more), most commonly to transfer the Reagents.
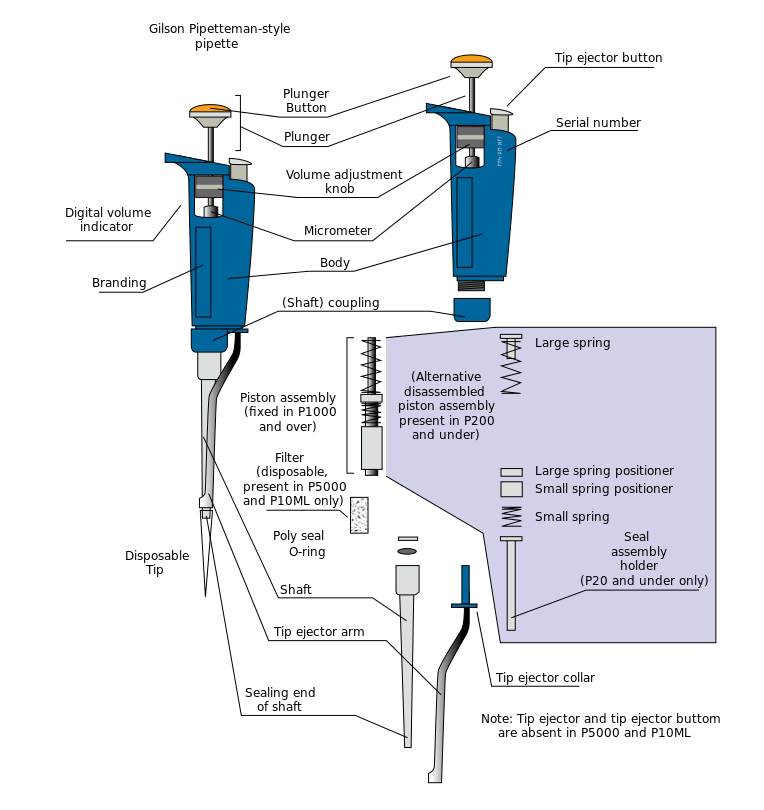
What are the Parts Of Micropipettes…
Most micropipettes have the following basic parts:
- Volume adjustment knob – it is turned to adjust the volume (in variable micropipette)
- Volume indicator
- Plunger button(operating button) – aspirate and dispense the solution
- Tip ejector button – controls the movement of tip ejector arm.
- Volume adjustment knob.
- Tip ejector arm – used to discard the tips after use.
The measuring ranges for the micropipettes most frequently used are:
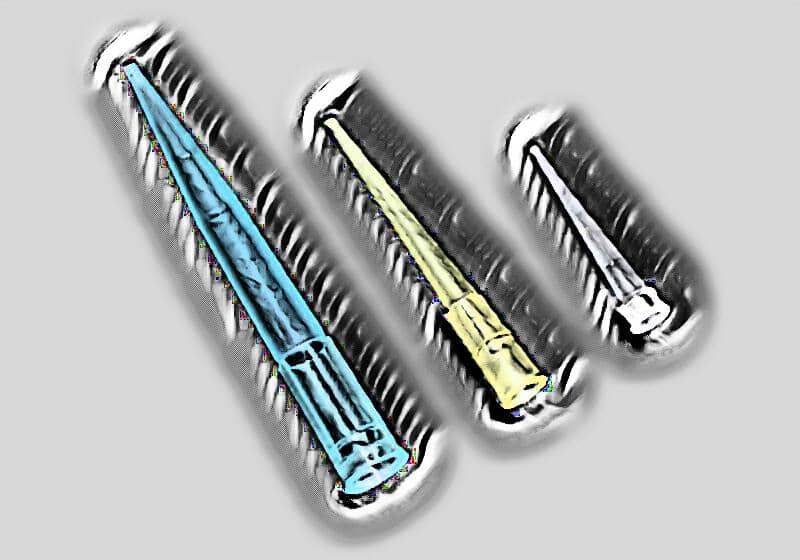
- P10 – 1.0-10.0µL – White tips (slightly translucent)
- P20 – 2.0-20.0 µL – Yellow tips
- P100 -10.0-100.0 µL – Yellow tips
- P200 – 20.0-200.0 µL – Yellow tips
- P1000 – 11000.0 µL –Blue tips (should only be used for volumes 200 or greater)
What are the Guidelines Of Micropipetting…
Check your pipette at the beginning of your working day for Dust & Dirt on the outside. If needed, wipe with the 70% Ethanol or Isopropyl alcohol.
Set the volume within the range specified for the pipette. Some are fixed pipettes whereas some are variable pipettes so adjust the plunger knob to the required volume within the range of the pipette.
Hold the pipette so the ‘Grippy finger’ rests on your index finger.
To maximize the accuracy, the pipette, tip, and the liquid to be dispensed should be at the same temperature.
Check that you are using tip recommended for that pipette which you are using. To ensure accuracy use only high-quality tips made from the contamination-free polypropylene.
Tips are designed for single use. They should not be cleaned for reuse as their materialistic characteristics will no longer be reliable.
Pre-rinsing (1-3 times) the tips with the liquid to be pipette may improve accuracy, especially when using positive displacement tips.
Avoid turning the pipette on its side when there is liquid in the tip. Liquid might stick to the interior of the pipette and contaminate it.
Avoid contamination to or from the fingers by using the tip ejector and gloves.
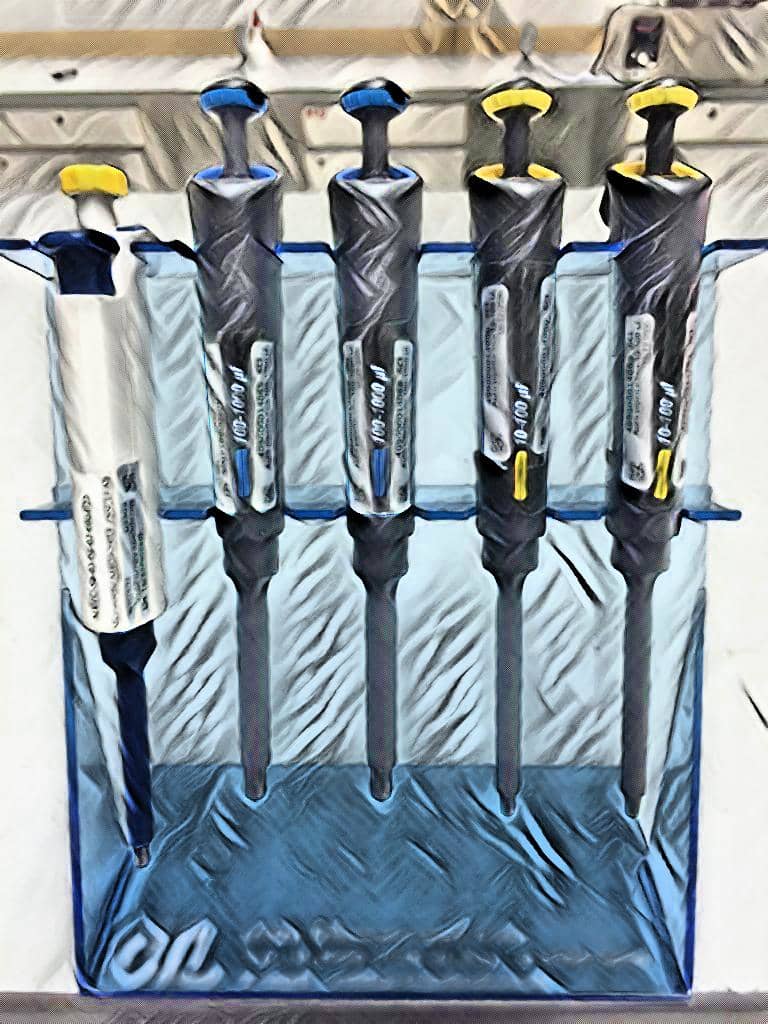
Store pipettes I an upright position when not in use. Pipette stands are ideal for this purpose.
Check calibration regularly depending on the frequency of use and on the applications, but at least once a year. If used daily, a three-month interval is recommended. Follow the instructions for recalibration in the manufacturer’s calibration manual.
The Forward Micro Pipetting Technique…..
Press the operating button (plunger) to the first stop.
Dip the tip into the solution to a depth of 1 cm or in the half of the solution vessel and slowly release the plunger.
Wait 1-2 seconds and withdraw the tip from the liquid. Touch it against the edge of the reservoir to remove excess liquid.

Wipe out the excess liquid that sticks outside of the tip using the tissue paper.
Dispense the liquid into the receiving vessel by gently pressing the plunger to the first stop and then press the plunger to the second stop.
This action will empty the tip. Remove the tip from the vessel, sliding it up the wall of the vessel.
Release the operating button (plunger) to the ready position.
The Reverse Micro Pipetting Technique…..
The reverse pipetting technique is used for pipetting the solutions with a high viscosity or a tendency for foam formation. Reverse pipetting is only possible with air displacement pipettes.
Press the operating button (plunger) to the second stop.
Dip the tip into the solution to a depth of 1 cm and slowly release the plunger. This action will fill the tip with a volume that is larger than the set volume. Wait 1-2 seconds and withdraw the tip from the liquid, touching it against the edge of the reservoir to remove excess liquid.
Dispense the liquid into the receiving vessel by pressing the operating button (Plunger) gently and steadily to the first stop. This volume is equal to the set volume. Hold the button in this position. Some liquid will remain in the tip and this should not be dispensed.
The liquid remaining in the tip can be pipette back into the original solution or disposed of together with the tip.
Release the operating button (plunger) to the ready position.
Various Precautions To Be Taken While Using Micropipettes …..
Micropipettes are expensive! To keep them functioning properly it is crucial that they are handled with care. Please follow these rules to keep them in working order:
Never adjust the volume beyond the range of the micropipette. No micropipette should be adjusted below zero µL. The P20 should never be adjusted above 20 µL, the P200 over 200 µL and the P1000 over 1 mL.
Never force the volume adjustor dial. If the knob becomes difficult to adjust it probably means that you are exceeding the limits of the pipette or the pipette is damaged. Report the problem to your instructor
Do not drop the micropipette.
Always use a smooth motion when using the micropipette. This will help give accurate measurements and also prevent breakage of the pipette. There should not be “snapping” noises.
Always keep pipettes upright.
Never lay a pipette with liquid in the tip on the bench.
Always choose the appropriate size pipette for the volume you are measuring.
Always dispose of tips in the appropriate waste receptacle.
Frequently Asked Questions (FAQs)
Q1. What is micropipette and its uses?
A micropipette is a laboratory tool used for measuring and transferring very small volumes of liquids accurately. It is used in various fields of science such as biology, chemistry, and medicine. Micropipettes come in different sizes, from microliters to milliliters, and are commonly used in DNA sequencing, PCR, and protein crystallization experiments.
Q2. What are the steps of micropipetting?
Micropipetting involves several steps, including setting the volume, aspirating the liquid, dispensing the liquid, and ejecting the tip. To aspirate, the plunger is depressed to the first stop, the tip is inserted into the liquid, and the plunger is released to draw the liquid up into the tip. To dispense, the tip is pressed against the side of the container, and the plunger is depressed to the second stop to release the liquid.
Q3. What is the importance of micropipette?
Micropipettes are important laboratory tools as they allow researchers to transfer and measure small volumes of liquid with high precision and accuracy. This is essential in many experiments, particularly in biology and biochemistry, where small variations in liquid volumes can significantly affect the outcome of the experiment.
Q4. What are micropipettes used to measure?
Micropipettes are used to measure small volumes of liquid, typically ranging from 0.1 μL to 10 mL. They are commonly used to measure DNA and RNA samples, protein solutions, buffers, and reagents in a variety of experiments, including PCR, gel electrophoresis, and protein purification.
Q5. What is the use of micropipette in laboratory drawing?
Micropipettes are used in laboratory drawing to accurately transfer small volumes of liquid from one container to another. This is important in experiments where precise measurements are required, such as in titrations or when adding reagents to a reaction mixture.
Q6. What are the uses of micropipette tips?
Micropipette tips are disposable plastic attachments that fit onto the end of a micropipette. They are used to prevent cross-contamination between samples and to ensure accurate and precise measurements. Micropipette tips come in a variety of sizes and materials, such as filtered tips for preventing contamination and extended length tips for accessing samples in deep containers.
User Review
( votes)Laboratory Hub aims to provide the Medical Laboratory Protocols & General Medical Information in the most easy to understand language so that the Laboratory Technologist can learn and perform various laboratory tests with ease. If you want any protocol to be published on Laboratory Hub, Please drop a mail at contact@laboratoryhub.com. Happy Learning!